Custom Menu Symbols for Articulate Storyline 360
Replaces the Storyline menu checkmark with custom symbols or text and sets, slide by slide, when they appear.
Download the tool (zip) Read the user guide
The download is a zip file. Unzip it, then open the HTML file in a web browser.
By downloading or using this tool, you accept the Terms of use. You use it at your own risk and on your own responsibility.
Problem
Storyline marks a slide with a checkmark in the menu as soon as the learner visits it, whether or not the slide is complete. Storyline has no setting to change the symbol or the condition.
Solution
Custom Menu Symbols replaces the checkmark with symbols you choose and lets you set when each one appears: when a slide opens, when its timeline ends, never, or when a Storyline variable has a set value. The tool reads your Storyline project and gives you two scripts and a checklist. It does not change your project file.
Steps
- Add your Storyline project file (.story).
- Choose when the symbol appears: when the timeline starts or when it ends.
- Add your favourite symbols, set their colour and size, and choose the default.
- Optional: give a slide its own timing, symbol or condition.
- In Storyline, follow the checklist: create the text variable and add the two Execute JavaScript triggers to each master slide.
- Publish the course and test it.
Read the full user guide below. It is also inside the tool: select the ? button at the bottom right of the tool.
Compatibility
Articulate Storyline 360, modern player with the menu turned on. Requires a current version of Google Chrome or Microsoft Edge.
User guide · version 3.17
How to Change the Menu Checkmark in Articulate Storyline 360
1. About the tool
Custom Menu Symbols replaces the checkmark in the menu of an Articulate Storyline 360 course with symbols that you choose. You also choose when each symbol appears: when a slide opens, when its timeline ends, or when a Storyline variable has a set value.
The tool reads your Storyline project and gives you two scripts and a checklist. You paste the scripts into the slide masters of your project. The tool does not change your project file.
Terms used in this guide
| Term | Meaning |
|---|---|
| Favourite | A symbol that you add in the tool. You can use any favourite on any slide. |
| Default symbol | The favourite that every slide uses unless you choose another one for that slide. |
| Master slide | The top slide of each group in Slide Master view in Storyline. The scripts go on the master slides. |
2. Before you begin
You need:
- Articulate Storyline 360 and your Storyline project file (.story).
- A course that uses the modern player with the menu turned on.
- The current version of Google Chrome or Microsoft Edge on a computer.
- The Custom Menu Symbols link or file. The tool opens in your web browser and needs no installation.
Your project file is read in your browser and stays on your computer.
3. Set up the symbols
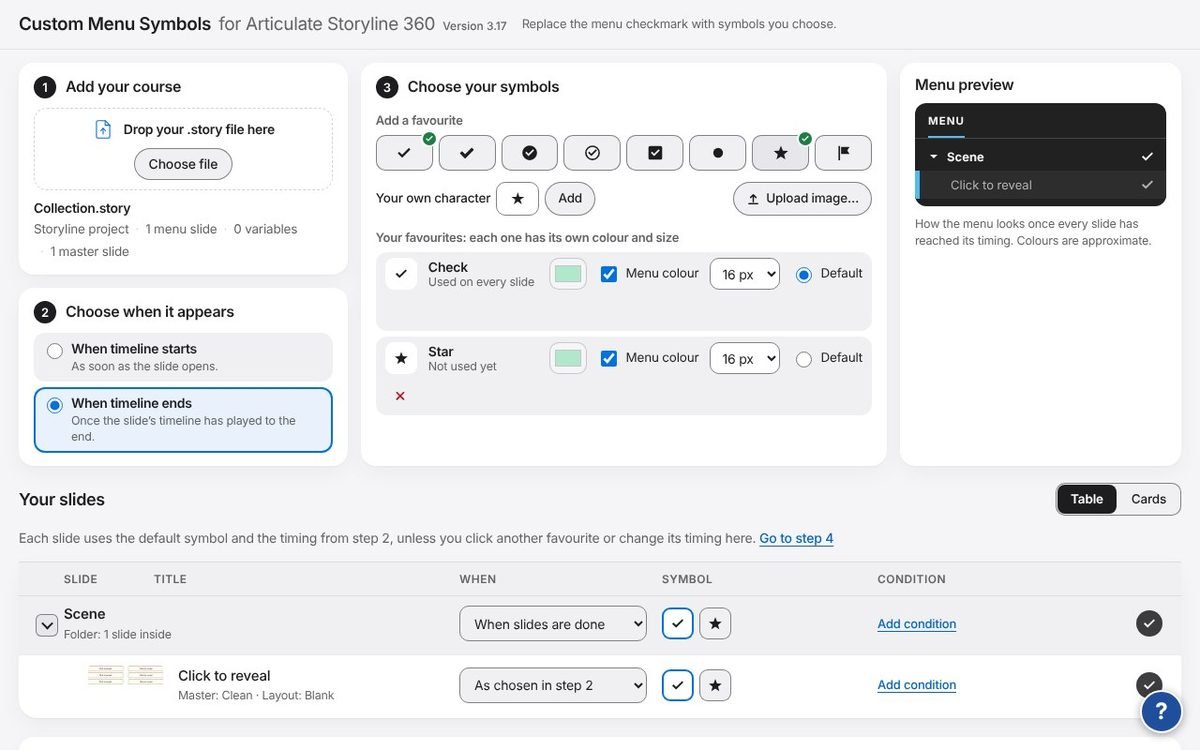
Steps 1 to 3 are at the top of the tool, with a preview of the menu on the right.
The tool does not keep your work after you close or reload the page. To continue later, select Save settings at the end of step 4, and use Load settings the next time.
- Add your course. In Add your course, select Choose file and choose your .story file.
- Choose when the symbol appears. Select When timeline starts or When timeline ends. This applies to every slide.
- Add your favourites. Under Add a favourite, select a symbol, type your own character and select Add, or select Upload image.
- Set each favourite. Each line under Your favourites has its own colour and size. Select Default on the favourite to use for every slide. Select the × to remove a favourite.
- Check the menu preview. Menu preview shows how the menu will look.
To use one symbol for the whole course, add it, select Default on its line, then go to section 6.
4. Give a slide its own rule (optional)
Your slides lists every slide in the same groups as your menu. Each slide follows steps 2 and 3 unless you change it here.
- Open or close a group. Select the arrow beside a slide or folder that has other slides under it.
- Change the timing. Under When, keep As chosen in step 2 or choose another timing for this slide.
- Change the symbol. Under Symbol, select one of your favourites.
- Add a condition. Select Add condition to show the symbol only if a Storyline variable matches.
- Show no symbol. Under When, choose Never.
- Check the result. The symbol at the end of the row is what the learner will see in the menu.
Select Cards at the top right of the list to see larger pictures of your slides. Each card shows the menu line that the learner sees. On a card, select Change to open the same settings.
5. Show a symbol when a button is selected
This example shows the symbol for a slide only after the learner selects its Start button.
- Set the rule in the tool. On that slide, under When, choose By variable only. In the condition, choose Only if, enter
StartClickedand keep is true. - Create the variable in Storyline. Create a True/False variable named
StartClickedwith the default value False. - Add the trigger to the button. Add an Adjust variable trigger that sets
StartClickedto True when the user clicks the button. Place it above any Jump to slide trigger.
Storyline runs the triggers on the button from top to bottom and stops when it leaves the slide. If Jump to slide comes first, the variable is never set.
6. Finish in Storyline
Finish in Storyline, below the slide list, is a checklist for your course. Select each item as you complete it.
- Create the text variable. In Storyline, create a text variable named
MenuSymbolsDonewith no default value. Capital letters matter. - Set up the variables for your conditions. This item appears only if you added conditions.
- Open Slide Master view. On the View tab, select Slide Master.
- Add two triggers to each master slide. Select the master slide, not the layouts under it. Add an Execute JavaScript trigger when the timeline starts and paste script A. Add a second one when the timeline ends and paste script B.
- Save, publish and preview. Check a few slides to confirm that your symbols appear.
Triggers on a master slide run on every slide that uses one of its layouts. Repeat item 4 for every master slide that the checklist lists.
Test the published course in your LMS before you release it to learners.
7. Make changes later
- Select Load settings and choose the settings file that you saved. Add your .story file again.
- Make your changes.
- Select Copy script A and paste it over the old script A on every master slide. Script B never changes.
- Publish the course and test it.
When you add slides to the course, you do not need to do anything if their master slide already has both triggers.
If a symbol does not appear
| Situation | What to do |
|---|---|
| No slide shows a symbol | Check the name of the variable MenuSymbolsDone, and check that both triggers are on the master slide. |
| One slide never shows it | A layer may pause the timeline of the slide, so the timeline never ends. Choose When timeline starts for that slide, or use a variable. |
| A button symbol never shows | Move the Adjust variable trigger above the Jump to slide trigger. |
For any questions, please send an email to contact@elearningdevtools.com